JARI’S BUILT-IN
CATEGORY: MORE PORT TOWNSEND
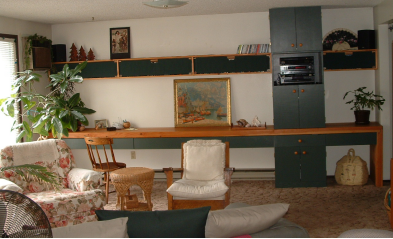
PHOTOS: 1) JARI’S END WALL
2) DRAWER MADE OF VINYL TUB
3) SHELF UNIT WITH CANVAS DOOR
Jari moved to Spokane in 1990. She got a job in a medical clinic there and moved into a nice apartment near her work. She planned on staying in that apartment for a long time–long enough to spend some money customizing it to her liking. She asked my help, and I was eager to assist.
Her living room was a rectangle with a stone fireplace across one corner. The seating, a sofa and two chairs, was grouped in front of the fireplace at a 45 degree angle to the room. Book cases took up the long side-wall between the living room and the kitchen. This left a 15 ft. end wall with no furniture. Jari wanted something that looked like a built-in to extend across the whole wall. She wanted this “built-in” to be as economical as possible and provide space for the TV, associated electronic equipment, plus CD and video storage. It should provide as much extra storage as possible and have a work surface plus a “stash space” (a place to stash her purse, shopping bag and briefcase) near front door at its right end.
The bug-a-boo was that there was a 10 ft. baseboard heater in the middle of that wall. Whatever we put there would have to span the heater from one end to the other and not obstruct the front of it. And since there were book cases on the side wall, I did not want a “book case look” on the end wall. It needed something more open.
So the beginning of the solution was a 3 1/8 inch x 21 inch x 20 ft. long glu-lam, which we ordered cut into three pieces: one 15ft. and two 30 inch lengths. The 30 inch pieces were for end supports. The 15 ft. length was sturdy enough to span the full width of the wall with its broad side up, making a 15 ft. long x 21 inch deep table top.

Suspended beneath the glu-lam for its entire length were drawers made of rectangular plastic tubs purchased at Rite-Aid for $7.00 apiece.

We faced them with 1 x 6’s. We hung the tubs by their lips from wooden drawer glides screwed into the beam. Cheap, light weight drawers! We painted the drawer fronts a gray-green color to match the sofa cover that I had made a year earlier out of gray-green duck. The fir glu-lam was left natural and finished with a wipe-on poly.
Next, we built three stacked cabinets to form a floor to ceiling tower, one below and two above the glu-lam and the same width as one drawer. It filled the space above and below the second drawer in from the entry hall. These cabinets were painted to match the drawer fronts. The glu-lam between the “tower” and the entry hall became the Stash Space. The bottom tower unit had sides that extended from the floor to the glu-lam, on either side of the drawer, in order to support the weight of the upper cabinets. It was only a foot deep because 6 inches of the baseboard heater extended behind it. The two top cabinets were the full depth of the glu-lam minus ½ inch to allow the curved edge of the beam to protrude across the front. The lower of these units held the TV on a pull-out turntable plus the playing equipment. The top cabinet was an inch short of the ceiling for easy installation.
The third step of this assemblage consisted of eye level horizontal shelf units, one on either side of the tower. Basically these were two 1 x 8 shelves held together by a 2 x 8 back with 1 x 8 spacers and end pieces. The 2 x 8 back seemed like overkill, but it was so the unit could span the space between the tower and the farthest wall with only end supports so there would be no damage to the walls of this rented apartment.
Jari did not want the contents of these shelves to be visible, so I designed inexpensive “doors” out of awning canvas with doweling at the top and bottom. Cup hooks held the ends of the doweling for both the swings (hinges) and the fasteners. The hinged side was at the bottom; when open, the doors simply hung down. The awning material was plasticized so the corners could be cut in quarter circles around the cup hooks without needing to be hemmed. It was a stroke of luck that we found fabric that matched the paint and sofa color. Again, the wood was left natural. The fabric was only colored on one side, and I regret that I didn’t make the door fabric double so that the back sides would be the same as the front. Instead, to save fabric, I hemmed the edges. It did not look good when the doors were opened.

When installing these units it proved necessary to use a few screws into the wall studs. However, it was no more damaging to the wall than hanging paintings. When Jari moved paintings, she filled the exposed holes with tooth paste ! Her tooth paste was the same color as the walls.